Using gear labels
Labels connect your physical gear to GearScout. They speed up scanning for members and let non-members reach a public item page when they find or damage a tagged item.
Single labels and bulk labels
Print a single label from an item record or generate a batch when you are labeling an entire storage area.

Generate multiple labels
- 1Open the bulk labels page from an inventory record or the inventory tools.
- 2Choose how many labels you want for each item in the batch.
- 3Generate the PDF and print it on the label stock your group uses.
Public item pages
Every label can route to a focused public item page with a small set of safe actions, plus contained-gear packing lists and parent-item links when the item lives inside another kit.
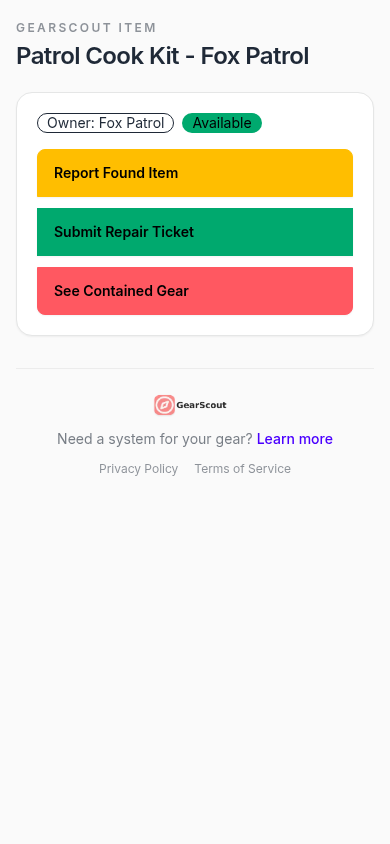
The public item page is intentionally simple. It is designed for quick access and for the person who found the item or noticed damage, not for a signed-in admin.
If the scanned item is a bag, case, or kit, the page can also show a contained-gear packing list. If the scanned item is inside another piece of gear, the page includes a link back to the parent item so the relationship stays easy to understand.
Which actions appear depends on the gear record. Report found item is always available. Check-in/out and repair require the per-item toggles described in Public item settings. Signed-in members see member actions regardless of those toggles.
Check in or out from the public page
When Enable External Check-Out is turned on for an item, anyone who scans its label can record a checkout or return without signing in to GearScout. This is useful for gear stored in a shared space, loaned to partners, or handled by people who do not have accounts.
- 1On the gear record, turn on Enable External Check-Out and save.
- 2Scan the label to open the public item page.
- 3Choose Check in/out item, enter your name, and complete any verification checklist required on return.
- 4Submit so the group sees the update in inventory and access history.
If the toggle is off, only signed-in members can check the item in or out from the app or scanner. The public page still supports found-item reporting.
Report a found or lost item
- 1Scan the label to open the public item page.
- 2Choose the found-item flow and provide your name plus any useful context.
- 3Submit the report so the group can follow up from the internal app.
Open a repair ticket from the public page
When Enable External Repair Tickets is on for the item (the default for new gear), the public page shows a repair action that leads to the same public repair flow shown in the live app. Turn the toggle off on the gear record if you only want members to log repairs inside GearScout.
Public repair form
The public repair form stays focused on the problem report itself so non-members can submit useful detail without needing the full app.
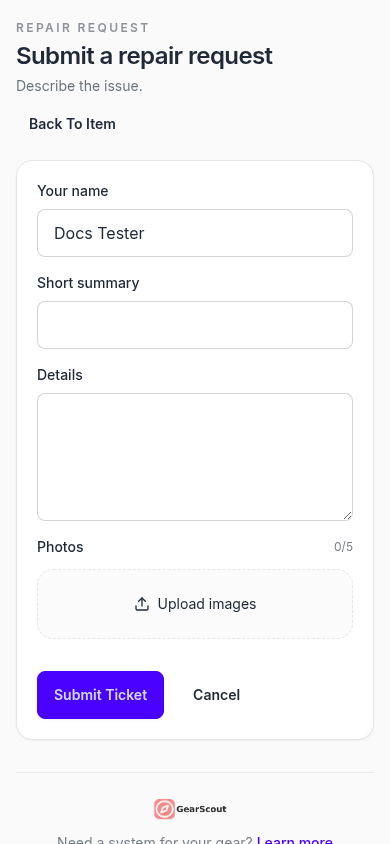
- 1Open the public item page from the label.
- 2Choose Submit repair ticket.
- 3Add a short summary, enough detail for the repair team to act on it, and photos if the issue is easier to explain visually.